How to Photograph Fireworks with Awesome Examples

With New Year 2013  just days away, I decided to put up an article on some simple tips on how to capture beautiful fireworks photographs using your DSLR's  this upcoming New Year's Eve.  A lot of skies all around the world will be lighten up with these very colorful and stunning fireworks displays which most of us wants watch and capture in our cameras. Here are some simple and easy tips you can learn to capture some beautiful fireworks photographs.

Fireworks Photography Camera Settings


In shooting Fireworks Display, I recommend shooting in Manual Mode since you are going to change several settings(ISO, Shutter Speed, Aperture) which you can only do in this mode. You can get best results when shooting in manual exposure and manual focus modes.

  • Set your Aperture between f8 - f16 to have larger depth of field.

  • Set your Shutter Speed to ‘BULB’ mode. This is a mode that allows you to keep the shutter open for as long as you hold down the shutter button.Fireworks move and the best way in capturing this movement like shooting light trails is using long exposure.

  • Set your ISO to 100. I recommend shooting at a low ISO to ensure the cleanest shots possible.

  • Switch your flash OFF. Shooting with a flash has no effect since your camera’s flash will only have a reach of a few meter.

  • USE TRIPOD . Since you are shooting with longer shutter, you must ensure that your camera doesn't move during the taking of your shots. No matter how steady your hand is, it's not steady enough.

Fireworks Photography Tip Composition Tips


This is the very crucial and difficult part on capturing stunning Fireworks photographs. Aiming where to frame your shot is one of the challenges you will going to face, Anticipation is the KEY. One way in overcoming this challenge is taking some test shots before the fireworks display and look for the best angle and framing on your location. After finding the best one, mount your camera in the tripod and face it to that angle.

Think about what is in the foreground and background of your shots and make sure you won’t have people’s heads ruining your shots. Keeping horizons straight. This is very important if you’re going to shoot with a wide focal length and will get other background elements in your shot.

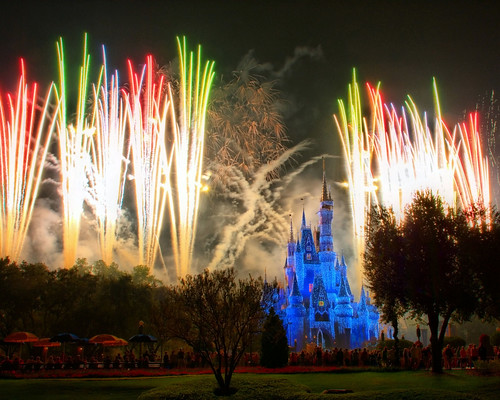
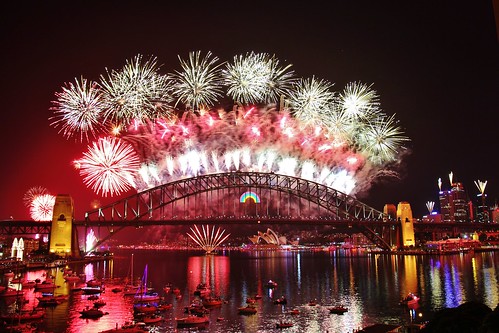
Some Amazing Fireworks Photographs


Note: I do not own these images. All the photographs are linked back to their respective owners.

Sydney New Years Eve Fireworks 2007

P8085849

Disney - Holiday Wishes (2) (Explored)

Sydney NYE 2011 Fireworks


Illuminations: Reflections of Earth

Opening Ceremony @ the Beijing Olympics

Disney - Remember...  Dreams Come True (2) (Explored)

D2X_2030.jpg @ f/4

NYC 4th of July Fireworks, 2007

Free Photography Tips: Action Photography

In general, the term action photography refers to shooting at sports events. It is really undeniable that capturing participants in sporting events is challenging, but action photography requires more than that. Any situation where people or objects are in motion(e.g spending time with a child, traveling with a car or train) is a potential exploit for this technique. In the next lines you will be presented with some useful tips that will help you improve your action photography skills.

 *** Note: I do not own these images. All the photographs are linked back to their respective owners. ***

Action Photography Tip #1: Exposure time


The action can be immortalized in the photo in two ways: the first version implies a lower shutter speed and the second is represented by a time of exposure that creates a blur effect and a feeling of movement. Moving the camera in the desired direction is relatively easy if you want to "freeze" the moving object, which can be captured even with lower values of exposure time, generally between 1/250 sec and 1/500 sec. In the event that the subject is moving at an angle of 45 degrees from the camera, freezing it at the above mentioned values is more difficult.
A gauche

action photography

Thus, to be sure that the picture is successful, it is recommended to choose a value between 1/500 sec and 1/1000 sec. But the worst situation is when the subject is located at an angle of 90 degrees from the camera. In these conditions exposure should be reduced to values close to 1/1000 sec most of the times and if you are shooting subjects moving at high speed, such as cars, motorcycle, running athletes and even wakeboarding, you are required to choose values of approximately 1/2000 sec.
berlinfootball_nb_120912_3475

Nick van Ingen | november storm Nick_van_Ingen-2012-11-25KSP_4155


Action Photography Tip #2: Synchronization


One of the most important aspects in action photography is synchronization, which is anticipating the right moment for the photo. If the start was made too early, the camera will not capture anything spectacular and if it was made too late, that time is of the utmost importance was missed. For these reasons this type of photography is important to know how to anticipate moments of maximum intensity. However, you will often not have to wait for a special event to practice your skills because movement can be found everywhere around us.
.action photography

Tail Grab at Sunset


Action Photography Tip #3: The necessary equipment


Freezing a subject in a photograph can be achieved by triggering the flash. In terms of objectives used for everyday actions you can use just about any kind of objective, but when it comes to shooting sports activities telephoto lenses are mandatory. If the action takes place near the camera, lenses with focal lengths between 200 mm and 300 mm are sufficient. But for the action that takes place on a runway, stage or stadium, which implies a rather large distance between the camera and the subject you need lenses with a focal length of 400 mm, 500 mm or even 600 mm in certain situations.

Action Photography Tip 4: Positioning


Besides the use of devices that will help capture the subject and setting a proper exposure time, camera positioning is another important factor contributing to the success of action photography. Its location must coincide with the person who will view the picture. If you manage to transpose the viewer into the atmosphere and set the scene your picture will be even more spectacular.
berlinfootball_nb_120912_3426

Top 3 Free Android Apps for Photography

It’s obvious that you cannot have Adobe Photoshop with you all the time to edit your pictures professionally.  However, if you own an Android device, things are much easier for you. If you don’t want to edit your pictures by transferring it to your computer and then using photoshop or other photo editing software, an android app will be the perfect choice you. If you are a passionate photographer and always busy in uploading your images with different cross-color effects and other photography effects, here are top 3 free android apps which are useful in easy editing of your photographs:

1.  Instagram

The name itself is very popular since Instagram is one of the best social photography apps available. Edit your photos and apply various filtered effects in just one click. Add different kinds of blur effects and frames/borders to give a decent touch to your photos. Share your photos on Twitter, Facebook and other social places.


2. Pixlr-o-matic

An app developed by popular company Autodesk. Pixlr-o-matic is one of those apps which provide you more than 100 effects and various frames and shades. You can edit your image in seconds and can generate 1000s of various effects from the combinations. Personally, this app is a must for every photographer and most of the casual photographers prefer this app over Instagram due to its variety in different types of effects and a very simple UI.

3. Fx-Camera

An app with a very simple UI which will help you to transform your image into a fantastic picture in seconds. This app allows you to take pictures in different styles such as FishEye, ToyCam, Comics, Manga style etc. If you are a casual photographer, this app can be very useful for you.

Honorable Mentions: Apart from these three apps there are few other good apps which deserve a try such as PicsArt Photo Studio, Insta Effects, Lomo Camera and easyFocus.

The Rise of iPhoneography

Mobile Phone Photography specifically iPhone Photography(iPhoneography) has advanced rapidly in a few short years. The iPhone is good enough to replace a point-and-shoot camera commonly used by the society. Equipped with a with a big 5 MP sensor, an impressive f/2.4 aperture, an IR filter and lots of software to make pictures as bright and beautiful as possible, from candid snapshots, ad campaigns and everywhere in between.

Why Do People Loving iPhoneography?


With over 50 million combined uploads to Flickr alone, Apple’s iPhone is fast becoming one of the most popular digital cameras in the world. One of the reasons for the popularity of the iPhone as a camera, is its mobility. As a phone, it’s a device you always carry with you. When people say this about Mobile Phone Photography or iPhoneography, they're usually talking about snapping those unexpected moments: a man in a banana suit on his way to work; a celebrity involved in a punch-up; or maybe just a beautiful sunset. The rise of mobile applications taking advantage of the rise in mobile phone photography specifically iPhoneography. Most mobile phone cameras take very dull photos. But it doesn't matter, because there are hundreds of apps to help you turn them into something amazing. Applications like Best Camera, Hipstamatic, Instagram, CameraBag, Vignette (Android), offer users the ability to quickly edit the images they have just taken.

iPhoneography sample shots


While iPhoneography won’t replace DSLRs and medium format cameras for studio and other professional work any time soon, they are fast approaching the level of dedicated compact cameras, poised to become in fact, an equipment for genres like street and event photography.

Plastic pool

Country store - 31/365

Freefest

Light Trails

iPhoneography

Note: I do not own these images. Images are linked back to their respective owners.

iPhoneography Apps


The App Store contains thousands of apps for shooting, editing, and sharing your photos directly from your iPhone. Because there are so many options, finding the iPhone photography apps that work best for you will completely depend on what you’re looking for. Here are some few of the best apps which are usually used in iPhoneography.

Camera+: This is my go-to app when it comes to shooting photos with my iPhone. Whether you’re a seasoned photographer or someone who’s barely touched a camera, Camera+ will make you love taking photos. Camera+ is what the stock Camera app should be.

Snapseed: Snapseed makes any photograph extraordinary with a fun, high-quality photo experience right at your fingertips. Anyone can enhance, transform, and share their photos with ease using incredibly advanced features. If you don’t have Snapseed yet, make sure to download it now.

Pro HDR: Bringing automatic high dynamic range photography to your iPhone, Pro HDR captures an image exposed for the highlights and another exposed for the shadows. It then aligns and merges the images, giving you a gorgeous HDR image at native resolution.

Slow Shutter Cam: Slow Shutter Cam brings new life into your device’s photo toolbox by letting you capture a variety of amazing slow shutter speed effects that you only thought you could get with a DSLR. It’s the perfect app to shoot light trail photographs.

Camera Awesome: Camera Awesome takes your photos to the next level by shooting fast and taking sharper, better-exposed shots. I mostly use it for its “Awesomize” feature which instantly makes any picture a better one. It also comes with various controls, filters, and much more. Give it a try.

Instagram: Do we even need to introduce Instagram? It is one of the most, if not the most popular app for sharing your best iPhoneography.

Featured Blogger:
Rahul Garewal is a content writer and a Professional Blogger. He is certified with E20-002 test which is very popular these days and have a great scope in the field of IT Certification. He always like to take certification exams and now he have planned to pass E20-005 test. These kinds of exams could secure your future as well as your job.

5 Simple Steps to Improve Your Photography Skills

Usually whenever new and aspiring photographers think of professional photographs, a studio with a lot of expensive photography equipment is the first thing that comes into their minds. Even though some of these expensive equipment are  helpful, they are not necessarily needed. Anyone can capture a head turning photo if you have the patience to take the time to compose a shot can make a huge difference in the result. Here are some simple ways to improve your photography skills.


1. Get in Close - Don't be in a big hurry to take the picture. Always check if there is enough of the subject; if necessary, zoom in. This will also help cut out any distractions around the subject. If you are trying to shoot a landscape then shoot the landscape. If you are trying to take a portrait with a landscape background, remember that the subject is still the person and not the landscape. Zoom in until the subject is dominant.

2. Don't Shoot Randomly - Take pictures of subjects that excite you. You may have to take quite a few pictures to discover what type of photography and subjects interests you. When you finally find your niche in photography, your excitement will reflect in your photos. Professional photographers have spent years photographing different aspects of the same subject. There is an endless supply of landscapes, sunsets, people and flowers. Again, don't waste your time shooting things that do not interest you unless searching for something that does.

3. Composition is the Key - Composition is always the key to have a great photograph. As what the quotes says, “A Picture is worth a Thousand Words”. When you are just beginning, try to keep the horizons straight. Use the viewfinder to crop out distractions. Change the position of the subject to your perspective. Shoot the subject from different angles and viewfinder location; an off-center shot often creates more interest.Don't lose track of what the subject is. If the subject's surroundings are busy and contrasting, use a narrow depth of field to blur the surroundings. This will make the subject really seem to pop out of the picture.

4. Get out from Auto - An interesting way to control the outcome of a photo is using the Manual Mode of your camera. With these, you have the full control of your camera. You can easily change the ISO, Shutter Speed, and Aperture. Manually controlling the shutter allows you to freeze time or let it go on to reflect motion. This is what allows for a freeze frame shot. A time lapse moment can be captured using a slower shutter speed. My favorite is freezing time at a sporting event and capturing what spectators often do not notice. The point is to experiment with different aperture settings.

5. Know Your Camera - Stick with basic camera settings and functions when you first get started. If you're planning to use the completely automatic settings, you may as well be using a point and shoot camera. Getting frustrated when first learning camera settings is common, but it does get easier with practice. After learning the camera settings thoroughly, it is okay to use one of the semi-automatic settings (auto aperture or auto shutter) and adjust the other manually. To obtain complete power over the outcome of the picture, shoot in manual. Remember, don't be in a hurry; learning how to correctly use a camera takes practice.

Metering and Metering Modes Explained

Learning what metering is and understanding each of the metering modes is really crucial for each and every photographer to know. Metering controls the exposure with minimum effort and take better pictures in specially in unusual lighting situations. Most advance Digital SLR and point-and-shoot cameras comes with the default metering set to multi-segment metering(Matrix Metering in Nikon and Evaluative Metering for Canon).When I first started photography,  it was really my frustration to properly expose my images not until I have learned how to use Metering. In the following paragraphs, I am going to explain to you simply each metering modes and how this metering modes can help you produce better photographs.

Metering Modes


Spot Metering

One of the metering modes  that is really good when shooting manually. As it name "spot" implies, the meter will read only from a  very small section which is as little as one percent of your total image. It will only evaluates the single point where you had set your focus point and then calculates the exposure based on that spot. For example, you want to take a photo of your friend under the sun while your under a shade, spot metering is the best mode to use to properly expose your subject. You need to set the camera to expose for the sunlight around your subject, not on the shade around you. Spot metering works great for back-lit subjects in situations like this. When you use  Matrix or Center-weighted metering modes, it would most likely result to a silhouette.


Matrix Metering

In this mode, your camera will divide your image into a number of smaller areas in which the camera will do the meter reading which are then all analyzed on individual basis for light and dark tones. It will then combine those reading from each of those areas with aperture and shutter speed to produce a near perfect result in most cases. The variables used on in analyzing each zone differs from manufacturer to manufacturer. Matrix metering is the default Metering Mode in most digital point-and-shoot cameras and Digital SLR's.


Center-Weighted Metering

From it name itself, this metering is more biased in reading toward the center of the frame. Your meter reading will have less attention on the corners and edges. The reading will not be affected from where you had set your focus point like the Spot and Matrix Metering Modes, instead, it will only just read from the center of the frame. This mode is great for  close-up portraits and relatively large subjects that are in the middle of the frame. One great example is when you are trying to take a headshot of a person with the sun behind, this mode will expose the face of the person correctly.


Changing Metering Modes


These varies from model to model, company to company. Please read your cameras manual in order to know how and where to change your metering modes.

Metering Modes Meter Reading


Your camera displays an exposure meter in the viewfinder and Shooting Info display. This meter is a little linear graphic that indicates whether your current settings will properly expose the image. If the bars on the meter goes to the right of 0, the image will be underexposed. If the indicator moves to the left of 0, the image will be overexposed.  When the meter is at the center or 0, you have now the proper exposure. The meter’s suggestion on exposure may not always be the one you want to follow.


Can Instagram and SEO Be Used Together for Business?

The $1 billion takeover of Instagram by Facebook took everyone by storm but all the hype finally seems to be setting down. Companies are now beginning to care less whether or not the decision to purchase Instagram was the right choice for Facebook. Companies are currently more concerned about leveraging this illustrious tool.

Facebook has not offered much information about how to optimize an Instagram photo. So at the moment, photos are being optimized the same way that a picture or a YouTube video on a blog post would be optimized, by using keywords in the surrounding tags, text and titles. However, optimizing Instagram photos for search engines is not what these companies are concerned about, but instead what they want to know is how the use of Instagram can be optimized for visitors.

Visitor optimization is a topic that has been discussed many times over the years. It is a well known fact that "content is King" and soon enough, the topic of the discussion switches to search engines. Nonetheless, the importance of photos on the website of a company is being brought by the buzz surrounding Instagram. Renowned brands like National Geographic, Pepsi, and Starbucks have already started using Instagram photos on their website.

instagram


Why Are Photos Taken to a New Level by Instagram?


The prerequisite behind Instagram is a mobile phone with a simple point and shoot camera. Once a photo is taken by the user with a compatible camera phone, a filter is added as a result of which the photo looks more attractive and eye-catching. A photo looks different depending on the filter applied to it and so, these filters have been given different names. Usually, a vintage or glossy look is given to the photo by these filters, something which is absent in a traditional photo.

One of the reasons behind the increasing popularity of Instagram is that a photo can be edited so easily by everyday individuals. The appearance of photos enhanced by it, making them attractive to those who are non-photogenic, and these photos can be conveniently shared over social networking platforms using the app.

Top 5 Ways Instagram Can Be Leveraged by Your Business


Instagram can be utilized by any business that wants to include photos in a blog post, but a bit of effort has to be made for this. The end users of Instagram are after all people who love to take photos with their mobile phones, and for those running a company, they often do not have the energy or time to take photos. Nonetheless, it is possible to leverage Instagram more appropriately for a business, in the following ways:

Contests: This is perhaps the best way this tool can be utilized by businesses. A product can be sold by your company, customers can be asked to take photos of themselves with the product, and can be given the opportunity of winning a prize by uploading the photo. An element of interaction can also be added by giving people the chance to vote on the photo they like best.

Event Marketing: Another great way the tool can be leveraged is to ask people to take photos of an event being held by you. This will increase the excitement about the event in people and a layer of interaction will be added.

Social Media: Photos of your product/serve or your company should always been shared via social media. A hastag can be added to a photo when using Instagram as a result of which tabs can be kept on any photos of your business that you have shared on Twitter or any other social network.

Connection: Most people these days are using Instagram, so this is one more avenue where connections with your customers can be formed. Even if you don't think that posting pictures is valuable enough for your specific business, the employees should be urged to use this avenue as a means of connecting with customers.

Location: Location can be added to a photo by a company using Instagram. Thus, the location of your small business can be added this way, and this makes it more likely that some who is new to the area will see the photos. This can prove to be quite effective for entertainment joints and restaurants.

If you want to make the most of the photos present on your website, then you should use Instagram with hastags. Now is the perfect time to get started because of the buzz currently surrounding Instagram. Although particular brand accounts are not offered by the service, an individual account can still be created.

Canon Vs. Nikon: Which is Which?

Canon Vs. Nikon Debate


For the past decades, the debate between Canon Vs. Nikon  is still unsettled and many are still asking which of these two camera companies is the best? These two companies were the first to make the leap from film to digital, and their initial presence in the market make them the dominant players and still developing and pursuing innovation. If you have read some digital SLR press releases, you'll notice some similarities on both products of these two companies especially in terms of technical aspects and innovation. Either Canon or Nikon will come up with almost the same innovation on their products.


Canon Vs. Nikon Experience


I have spoke to several photographers and I asked their opinions about this issue. Each have their own views in which many tried to defend the the company of DSLRs they have. However, I got a chance to borrow and try shooting with a Canon 600D together with a Nikon D3100. I asked the owner to set up it with the same settings like mine. During his set-up, I see it a little bit confusing on changing the Menus on Canon. I found Nikon's menu more user friendly compared to Canons' menu. During my test shots, I noticed that the color in my shot with Nikon is more vivid/vibrant than my shot on Canon 600D. When I ask some photographers about it, many have agreed with me.


Canon Vs.  Nikon Conclusion


This issue is still unsettled nowadays, and the worst is, it created a barrier and discrimination between the users of both Canon and Nikon. Both companies have their own strength and weaknesses on their products. If you are planning to buy one, try to get a hands-on on both Nikon and Canon DSLRs. Try to compare and see it with yourself on which of the two your more comfortable. Feel your grip, try shooting on both cameras with same settings, post process it on you PC and do some comparison on the results. In my opinion, it does not really matter which is better. What matters most is that how you utilize and bring your camera beyond its limit.

I'm really interested about your opinion about this issue. For you, which is better, Canon or Nikon?  Try to leave your comment and opinions on the comment box below!

Camera Modes Explained

Most digital cameras do have a variety of exposure modes. There are several different 'modes' on your camera that determine the level of automation which your camera will provide. These modes are generally adjusted by a dial located on top of your camera, and may range from fully manual, meaning you have control over every single aspect of the shot, to fully automatic, meaning the camera will control everything for you based on the current conditions.

In the following paragraphs, I am going to explain the basic yet powerful modes of your camera.


APERTURE PRIORITY

With this mode, it enables you to have full control on the aperture(f-stop). Your camera will automatically adjust the shutter speed to give the correct exposure. Usually, this mode is particularly useful in low-light conditions where you want to set the brightest, widest f-stop in order to get the highest shutter speed and minimum amount of movement. If more depth of field is needed, you can use a small f-stop to get as much of your picture in focus as possible.

SHUTTER PRIORITY

This mode enables you to set the shutter speed and the camera will automatically select the aperture(f-stop) to give you correct exposure. This is very useful in shooting action pictures and you want to freeze the motion by setting high shutter speed. If you want to photograph a waterfall and you wanted blur, you can set a slower shutter speed and the aperture will adjust automatically.

PROGRAM

This leaves all the decision-making to the camera. The camera will set the combination of shutter speed and aperture so you don't have t think about exposure at all. It offers you the option to manually override settings such as focus and etc. Program mode is decent for beginners who want to be able to get quick shots without putting too much thought into it.

MANUAL

In this mode you have the most control of all, as you are able to adjust every aspect of the shot. There is absolutely no camera assist in this mode. You are able to adjust aperture, shutter speed, and ISO for yourself. Most experienced photographers will exclusively use manual mode due to the level of customization it offers.

PORTRAIT MODE

This mode brings subjscts in the foreground into sharp focus, and may enlist the use of a larger aperture to blur the background.

LANDSCAPE MODE

This mode is for taking shots of distant objects, or wide-angle shots, and will bring background objects more clearly into focus by setting a smaller aperture.

NIGHT SCENE MODE

 This mode uses flash and a slower shutter speed to illuminate the subject and allow more light to enter the camera.

MACRO MODE

Used for extreme close-up shots where the camera may have trouble focusing in other modes.

SPORTS/ACTION MODE

Use this mode for shots in which there is a good amount of motion which you want to capture without blurring.

Understanding these mode settings and how they work is one of the fundamentals of photography. You will never be able to take your shots to the next level unless you understand these settings.

Composition is the KEY

A lot of us photography enthusiasts, especially those who are just starting have been asking on how to take good photograph or images. Every image you see is either classified as a snapshot or  a photograph. What is the main difference of those two? Well, snapshots are those quick capture simple images that doesn't get your attention. Photographs are those  images that can easily grab anyone’s attention without any personal or other history. In short, the image speak for themselves.

You will be thinking right away, what do those photograph have? Well, it contains the main secret ingredient called "composition".

In the next paragraph, I'm going to share to you some of those most common yet very effective composition rules.

Rule of Thirds

When you compose your shot, imagine the viewer divided like below. Think about what elements of  your subject do you want to emphasize then try to position them at or near those lines and intersections of the grid. It don't have to be perfectly lined up as long as they're close.


Balancing Elements

Framing your subject off-center can create a more interesting photo, but it can leave an empty space on your shot. Balance is also essential, therefore you can balance the "weight" of your subject by including something to fill the space.


Leading Lines

Lines are also one of the powerful elements in an image. They have the power to draw the eye to key focal points in a shot and to impact the ‘feel’ of an image greatly.

Diagonal, Horizontal, Vertical and Converging lines all impact images differently and should be spotted while framing a shot and then utilized to strengthen it.


Depth of Field

The depth of field can drastically draw impact  to the composition of an image. It isolates the subject from its background and foreground or it can put the same subject in context by revealing it’s surrounds with a larger depth of field.


Viewpoint

Instead of just shooting from eye level, try shooting from high above, down at ground level, from the side, from the back, from a long way away, from very close up, and so on. Viewpoint has a great impact on the composition of a photo.


Symmetry and Pattern

There are a lot of symmetry and patterns around us, both natural and man-made. Emphasizing these patterns can lead to striking shots .


I myself didn't see these things as rules, instead, I consider those when setting up a cool shot. It really takes time to master these guidelines, somehow, once you are very acquainted with it, you can easily produce great shots. Always remember that "Composition will always be the Key" to any  photograph.

RAW vs. JPEG

RAW vs. JPEG? Which file format is advisable for photographers who are just starting and even those who are already professionals? Each has their own opinions on which of the two they preferred the most. Some prefers JPEG, and some loves RAW. Many have been asking which really dominates among this two so I decided to share some thoughts and experiences on this debate. Before I got my first DSLR, I have read several articles about this. By the way, to those who are new, I'm talking about which file format saving you use with your photos in your camera.


I took two images with a RAW+JPEG FINE mode; 1 overexposed and 1 underexposed. I created two presets for the underexposed and overexposed images to adjust it back to a usable image. I applied the same preset to the underexposed RAW and JPEG images and other preset to the overexposed RAW and JPEG images. See the difference when you apply the same preset to the RAW and JPEG files. Did you notice how the two differs? Observe carefully how the underexposed RAW turned into a nice image while there is a little distortion on the colors of the underexposed JPEG file. Also try to observe closely the overexposed photos with applied preset. Let us try to elaborate further these two shooting modes.


RAW


Shooting in Raw provides you with plenty of flexibility when deciding how the final image looks when you post process it on programs like Adobe Lightroom. RAW files hold all the RAW data captured by the camera, uninterrupted and unaltered. It can be thought of as digital negatives. Raw gives you maximum control in the digital darkroom.  It allows you to change white balance, exposure, saturation, sharpness, curves, etc with less quality loss than you’d experience with JPEG. Somehow shooting in RAW only allows you to shot less than shooting in JPEG. RAW files consume more memory on your card since it holds all the RAW data captured by the camera. Viewing a raw file is not a big problem at all, you can download softwares like PICASA Photo Viewer.


JPEG


JPEG file contains less data which depends on the specified size and compression/quality settings. JPEG compresses image data into a smaller file size. The advantage of JPEG is that it is easy to view and edit with any image editing program. You can maximize your memory card which allows you to shoot more since JPEG are stored in small file sizes.  However you have less control over the way the final image appears since it is a compressed file which loses some image data. Correcting mistakes of color and exposure will be a little harder compared with the RAW shoot.


If you're the sort of person who always dreamed of developing your own film, then RAW is the perfect choice. Shooting in RAW usually makes the most sense if your goal is to get the highest quality image possible. On the other hand, if you enjoy taking photos much more than manipulating them, JPG is a much better option.


The Exposure Triangle

Exposure plays very important part in taking good pictures. This determines whether your shot was properly exposed, underexposed or even overexposed.There are three main elements that need to be considered when playing around with exposure; ISO, Shutter Speed and Aperture. Aperture is ‘the size of the opening in the lens when a picture is taken. ISO is the the measure of a camera sensor’s sensitivity to light. Shutter speed is ‘the amount of time that the shutter is open’. These three elements forms the "Exposure Triangle".


exposure triangle


To explain it simply, we'll take it like this.

Aperture is like a window. If it’s fully open, the  more light gets through and the room is brighter.


Shutter Speed is how long the window is open. The longer you leave them open the more that comes in.


ISO is the amount of noise you will see when you are inside the  room. The higher the ISO, the more noise you see in the room.


Aperture is measured in "f-stops",  for example f/2.8, f/4, f/5.6,f/8,f/22 etc. Moving from one f-stop to the next doubles or halves the amount of light that gets in. It also affects the Depth of Field (DOF). Depth of Field is the amount of your shot that will be in focus.


Higher f-stops(e.g  f/11 to f/22) means larger depth of field, while lower f-stops(e.g f/1.2,  f/1.4, f/1.8, f/2.8) gives you shallow depth of field.


Shot @ F/1.8 (Blown out background)


Shot @ F/11 (Larger Depth of Field)


Shutter speed is measured in seconds(1", 10", 20" ,etc ) or in most cases fractions of seconds(1/500, 1/250, 1/125, 1/60, 1/30, 1/15, 1/8). To freeze movement in an image you should have to choose a faster shutter speed and to let the movement blur you should have to choose a slower shutter speed.

1/400 Shutter Speed (Freezes the image)


20''  Shutter Speed (Light Trails and image blur)


The ISO speed(100, 200, 400, 800, etc) determines how sensitive the camera is to incoming light. A lower ISO speed(100, 200, 400) is almost always desirable, since higher ISO speeds dramatically increase image noise.


Shoot @ ISO 1600 (Can you see the noise?)


Remember that thinking about either Apperture, ISO, Shutter Speed in isolation from the other two elements of the Exposure Triangle is not really a good idea. As you change any of these elements, you’ll need to change one or both of the other elements to compensate for it.


For example if you speed up your shutter speed one stop (for example from 1/125th to 1/250th) you’re effectively letting half as much light into your camera. To compensate for this you’ll probably need to increase your aperture one stop (for example from f16 to f11). The other alternative would be to choose a faster ISO rating (you might want to move from ISO 100 to ISO 400 for example).


NO to SOPA and PIPA!

Web Goes on Strike!  January 18, 2012 marked the Largest Online Protest. Thousands of sites  went blackout and protested against SOPA and PIPA, two US bills racing through Congress that threaten prosperity, online security, and freedom of expression. However, many are still unaware of what SOPA and PIPA all about and how could it affect the Internet and its users.


What is SOPA and PIPA?


Stop Online Piracy Act (SOPA), also known as House Bill 3261 or H.R. 3261 , if made law would allow the U.S. Department of Justice, as well as copyright holders, to seek court orders against websites accused of enabling or facilitating copyright infringement. Depending on who makes the request, the court order could include barring online advertising networks and payment facilitators from doing business with the allegedly infringing website, barring search engines from linking to such sites, and requiring Internet service providers to block access to such sites.


PROTECT IP Act (Preventing Real Online Threats to Economic Creativity and Theft of Intellectual Property Act of 2011 or PIPA), also known as Senate Bill 968 or S. 968 is a proposed law with the stated goal of giving the US government and copyright holders additional tools to curb access to "rogue websites dedicated to infringing or counterfeit goods", especially those registered outside the U.S.


How does it affect you? How far will they take all this?


Now the government and corporations could block any site, foreign or domestic just for one infringing link. Sites like YouTube, Twitter Facebook would have to censor their users or get shut down since they become liable for everything users post. Private Corporations will have the ability to shut down unauthorized sites where people download Movies, TV Shows and Music.  An ordinary users could go to jail for five years for posting any copyrighted work-even just singing a pop song.


Sites that we have been using and had a great help to us like Wikipedia, Mozilla, WordPress.org, MoveOn.org, TwitPic, Minecraft, Free Press, Good.is, Reddit.com are just some of the many sites that will be affected with these bills.


As quoted by Mark Zuckerberg, CEO of Facebook, "The internet is the most powerful tool we have for creating a more open and connected world. We can't let poorly thought out laws get in the way of the internet's development. Facebook opposes SOPA and PIPA, and we will continue to oppose any laws that will hurt the internet."


LEARN MORE 


Let your Voices be heard before it is too late. Depend our Online Freedom.

[button color="eg. black, red, blue, orange, green, light" link=""]Send them  a message[/button]

Welcome 2012, Happy New Year Everyone!

Goodbye 2011. Full of smiles and tears. Ups and Downs. Somehow, I think I'm still so blessed last year despite of all the circumstances I've faced. I'm really thankful on all the good things that happened to me. All the blessings that I received, from small to big things.

Welcome 2012. I hope this year would be a great one. May all the blessings and happiness be with us always! HAPPY NEW YEAR EVERYONE! :)

Here are some shots on the fireworks display last night! Hope you like it!  It is all hand held, no tripod that's why it is not so great.

Click on the photos to have a larger view!

[AFG_gallery id='7']